CSIRT second brain: workshop introduction (French)
Bonjour à tous ! Le 1er octobre 2026, j’ai animé à Stockholm un atelier consacré au « CSIRT second brain » (ou « second cerveau » en français), pour les équipes de réponse à incident. Il s’inscrivait dans le cadre des 78e rencontres du TF-CSIRT, organisées en Suède du 29 septembre au 1er octobre (auxquelles j’ai aussi assisté 😊).
J’ai préparé cet atelier suite au meeting précédent du TF-CSIRT à Riga au printemps, où plusieurs personnes m’ont demandé de montrer comment on s’y prend au CERT pour qualifier nos incidents avec des agents. Et autant c’est « assez simple » à expliquer, autant l’implémentation réelle en prod est vite complexe à reproduire : entre le choix des LLM, les tools, les MCP, les skills et les bases de connaissances…
Mettre tout ça en musique dans un atelier suffisamment simple pour que tout le monde comprenne en une demi-journée, gratuitement, mais suffisamment complexe pour être représentatif de la réalité, c’était un beau challenge sur lequel je me suis fait des nœuds au cerveau… pour vous sortir la version la plus simple d’un agent SOC/CSIRT de qualification d’incidents.
L’idée de mon workshop est de conserver le contexte et de le réutiliser au prochain incident. D’un incident à l’autre, les alertes, les tickets, les notes et les commandes lancées dans un terminal sont souvent similaires. Nous construirons donc un petit environnement sur Ubuntu, avec Obsidian pour les connaissances, OpenCode pour l’assistance IA, des MCP pour les relier, puis un outil fait maison avec AbuseIPDB pour enrichir la réputation des adresses IP.
Ceux qui ont suivi mes expérimentations avec Codex sur mon serveur retrouveront une approche familière : des outils concrets, du contexte et des résultats à vérifier. Ici, nous partirons d’une alerte Suricata de démonstration (issue du serveur qui héberge ce blog, d’ailleurs) pour créer des notes d’incident, du renseignement, un playbook et un dossier d’enquête liés entre eux. Les décisions resteront du côté des analystes.
La session inscrite au programme officiel a eu lieu le 1er octobre 2026 de 9 h à 12 h et était limitée à 25 participants. Ce billet en constitue le support pratique : le guide reste en anglais pour être utilisé pendant l’atelier ou repris ensuite. Préparez votre VM, on va mettre les mains dedans !
CSIRT second brain: workshop introduction (English)
Hello everyone! On 1 October 2026, I ran a workshop in Stockholm on building a CSIRT second brain for incident response teams. It was part of the 78th TF-CSIRT Meeting, held in Sweden from 29 September to 1 October (which I also attended 😊).
I prepared this workshop after the previous TF-CSIRT meeting in Riga in the spring, where several people asked me to show how we use agents to triage incidents at our CERT. And while it is “fairly simple” to explain, the actual production setup quickly becomes complicated to reproduce: there’s the choice of LLMs, tools, MCP connectors, skills and knowledge bases…
Bringing all of that together in a workshop that was simple enough for everyone to follow in half a day, free of charge, yet complex enough to reflect real-world work was quite a challenge. I tied my brain in knots… to bring you the simplest version of a SOC/CSIRT agent for incident triage.
The idea behind my workshop is to preserve context and reuse it on the next incident. From one incident to the next, the alerts, tickets, notes and terminal commands are often similar. We’ll build a small Ubuntu environment with Obsidian for knowledge storage, OpenCode for AI assistance, MCP connectors to link them and a home-made AbuseIPDB tool for IP reputation enrichment.
If you have followed my experiments with Codex on my server (in French), the approach will be familiar: practical tools, context and results that need checking. Here, we’ll start with a sample Suricata alert (from the server hosting this blog, actually) to create linked incident notes, intelligence, a playbook and a case. Analysts will remain responsible for the decisions.
The session listed in the official agenda took place on 1 October 2026 from 09:00 to 12:00 and was limited to 25 participants. This article is the practical workshop guide, kept in English so you can use it during the session or work through it afterwards. Get your VM ready, and let’s get started!
About / Legal
FR: Sauf mention contraire, le contenu publié ici est mis à disposition sous licence Creative Commons Attribution – Pas d’Utilisation Commerciale 4.0 International (CC BY-NC 4.0). Vous êtes libre de partager et d’adapter ce contenu, à condition de créditer de manière appropriée l’auteur original, selon le cas, de mentionner la source originale et de ne pas utiliser le contenu à des fins commerciales.
EN : Unless otherwise stated, content published here is licensed under a Creative Commons Attribution-NonCommercial 4.0 International License (CC BY-NC 4.0).You are free to share and adapt this content, provided that appropriate credit is given to the original author, where applicable, the original source is referenced, and the material is not used for commercial purposes.
License: https://creativecommons.org/licenses/by-nc/4.0/
Build a CSIRT Second Brain with OpenCode, Obsidian, MCP, and an AbuseIPDB custom tool – A Practical Setup Guide
This workshop walks you through building an AI-assisted second brain for CSIRT alert processing on an Ubuntu sandbox VM. You will combine Obsidian for storage and OpenCode for the AI layer, using MCP connectors and developing tools to tie everything together.
The focus of this workshop is to demonstrate how you can use AI to speed up your SOC/CSIRT alert processing and make life easier for your analysts.
1. Workshop Goals
By the end of this session, each participant will have:
- A local Obsidian vault with a CSIRT-oriented folder structure and guidelines.
- An AI layer (OpenCode) connected to the vault via MCP.
- One complete incident chain built automatically from a raw Suricata alert.
- A custom tool for a CTI enrichment workflow using AbuseIPDB to validate IP reputation.
Prerequisites:
To follow this workshop, you will need:
- A fresh Ubuntu 22.04 or 24.04 virtual machine with sudo or root privileges.
- An internet connection accessible from the VM.
“Nice to have”
These resources are not required for the workshop, but we encourage you to explore them separately to better understand the exercise and AI concepts such as LLMs and agents:
- AWS Generative AI Security Scoping Matrix will help you understand the different types of models and their uses.
- “AI Is the Smartest Intern You’ll Ever Have” principle (src, src)
- Prompt frameworks such as COSTAR Prompt Engineering (src, src) or the AUTOMAT Framework (src)
- Hugging Face Agents training and certification: a very good free course with an associated certification. The first level can be completed in a few hours.
2. Environment Deployment
Path A – Native Install (main)
(Installation Path B, based on a Docker Compose stack, is available in the appendix.)
Step A1 – Update the system
Run in your terminal:
sudo apt update && sudo apt upgrade -yStep A2 – Install Obsidian (.deb package)
cd ~/Downloads
wget https://github.com/obsidianmd/obsidian-releases/releases/download/v1.13.4/obsidian_1.13.4_amd64.deb
sudo apt install ./obsidian_1.13.4_amd64.deb
Step A3 – Install and run OpenCode
sudo apt install curl
curl -fsSL https://opencode.ai/install | bash
source ~/.bashrcThen:
opencode #you can hit Ctrl-C to quit opencode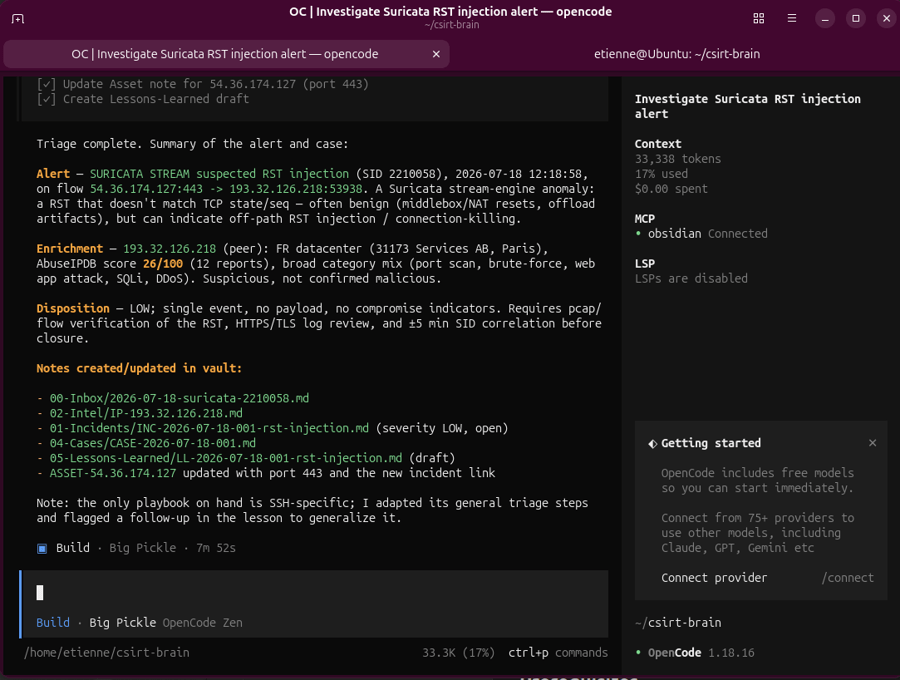
Step A4 – Start Obsidian
Start Obsidian
Obsidian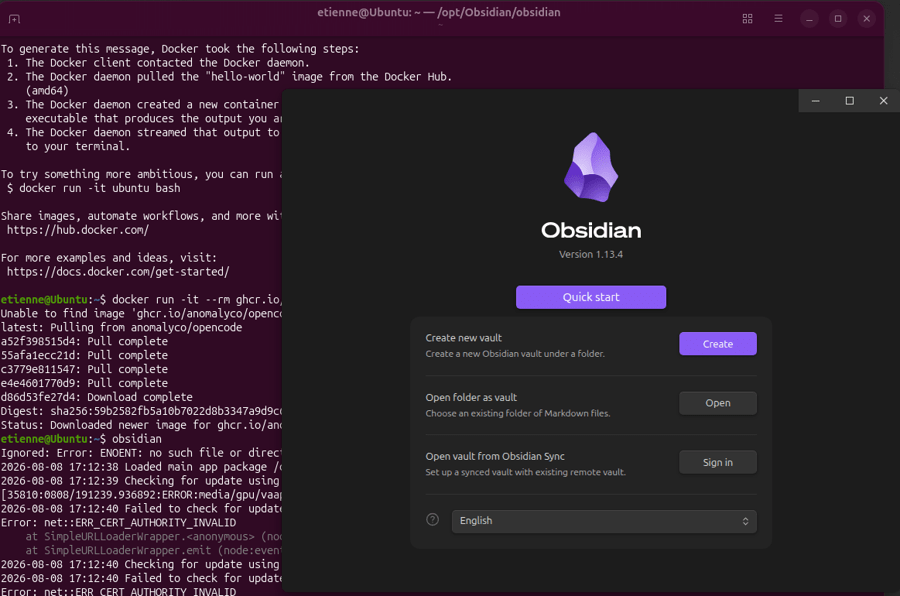
3. Connect Obsidian to OpenCode via MCP
In the following section, we’ll assume that you followed installation Path A. If you followed Path B, you’ll need to adjust the configuration file paths from their default locations to the associated Docker volume in /var/lib/docker/volumes/.
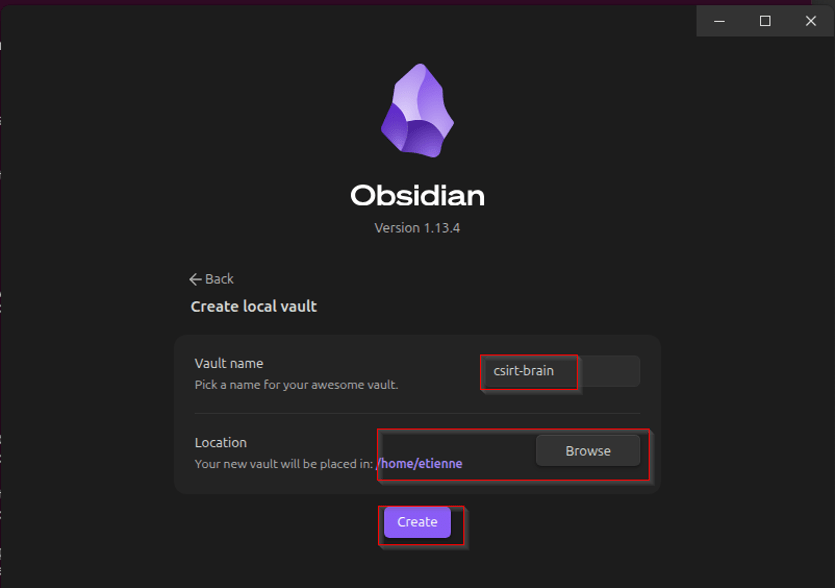
In Obsidian, create a new vault (e.g. csirt-brain)
- Open Obsidian and create or select your vault (e.g. csirt-brain).
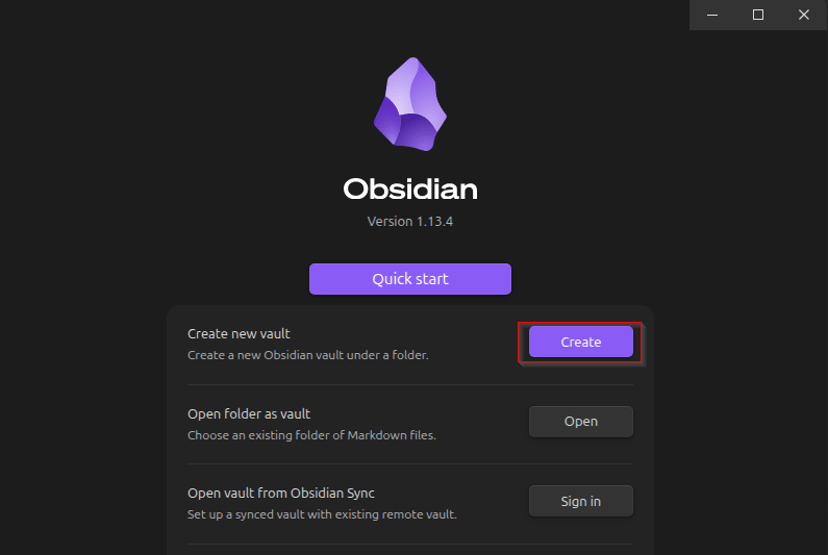
- Create a vault named csirt-brain in the current user’s home directory.
If you’re not familiar with Obsidian
Obsidian is a notes app that stores everything as plain Markdown files in a single folder on your machine. Each file is a note; folders are just normal directories; and links between notes are created with a simple wiki‑style syntax.
To get a feel for it:
- In your csirt-brain vault, click New note and name it “Incident workflow”.
- Type a short sentence, for example:
This vault will store my incident notes and link them to related intel and playbooks.
- Now type two opening square brackets [[, a word, then two closing square brackets ]], for example:
My current priorities are in [[CSIRT goals]].
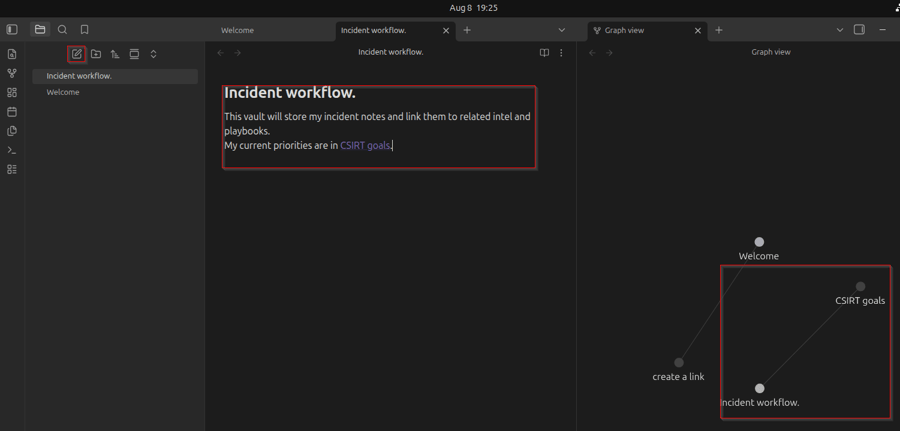
- When you finish typing [[CSIRT goals]], Obsidian turns it into a link.
Clicking that link will either:- open the existing note CSIRT goals if it already exists, or
- let you create a new note with that title.
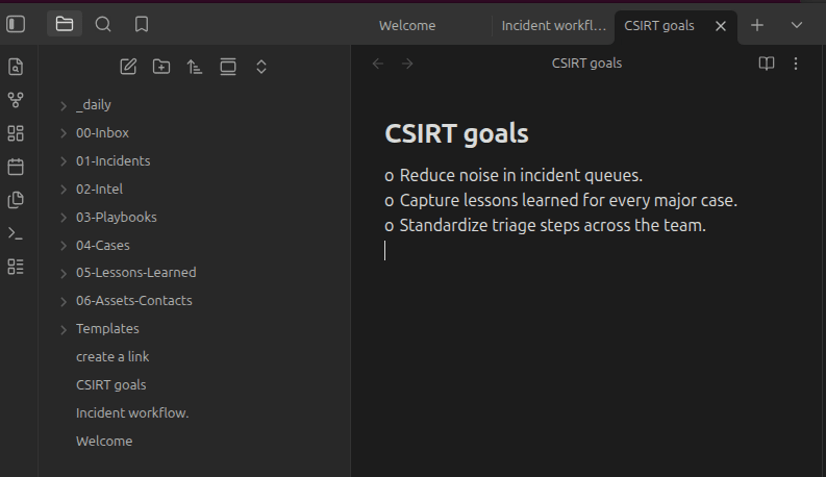
- Create the CSIRT goals note and add a few bullets, such as:
- Reduce noise in incident queues.
- Capture lessons learned for every major case.
- Standardize triage steps across the team.
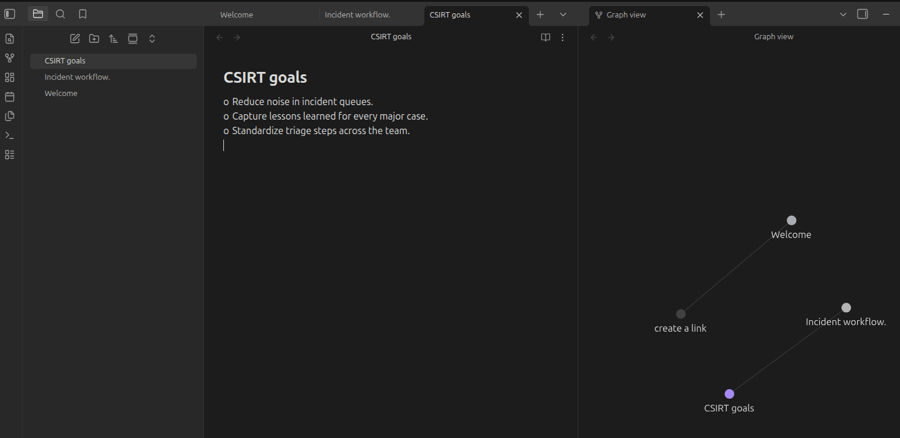
You now have two notes that reference each other: the Incident workflow note points to your goals, and the goals note appears in Obsidian’s graph and backlinks views. This is exactly how the CSIRT second brain will grow over time: incidents, intel, playbooks, and lessons learned all become linked notes in the same vault.
Install the « Local REST API with MCP » community plugin
- Click the Settings icon (bottom-left).
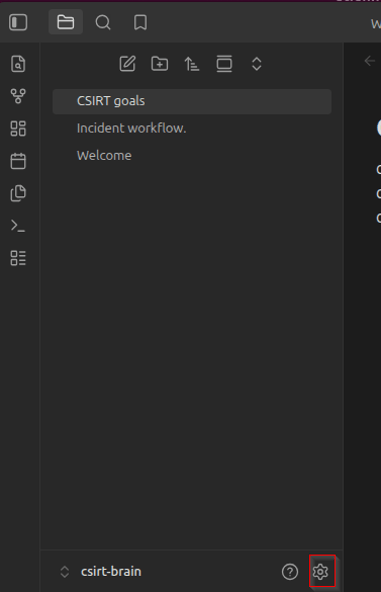
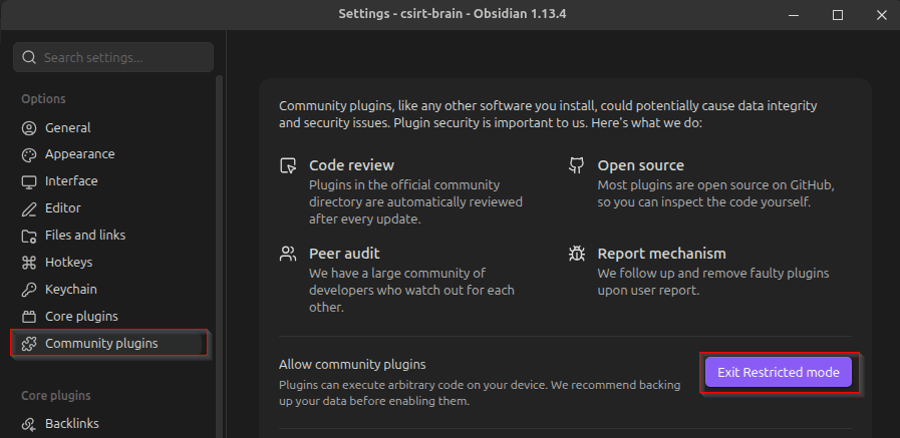
- Go to Community plugins.
- Turn on “Community plugins” (Exit Restricted Mode).
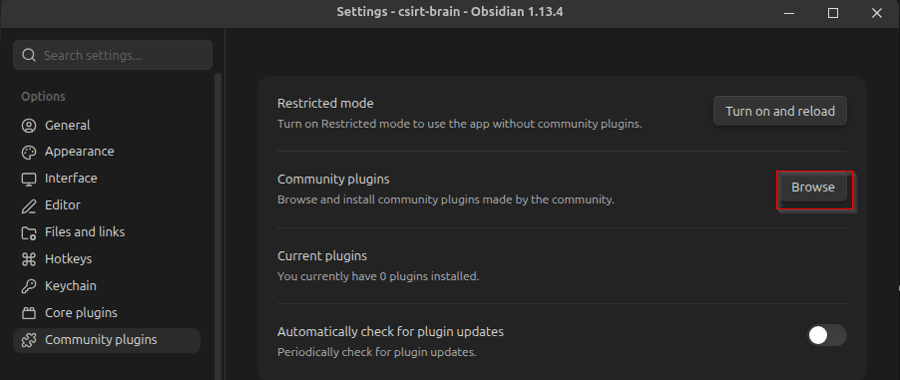
- Click Browse.
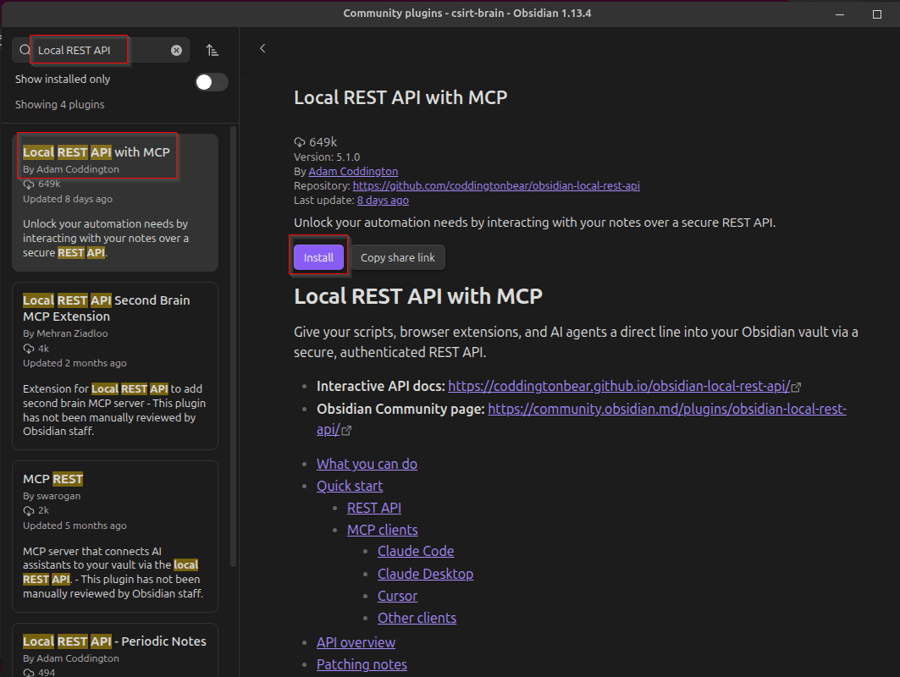
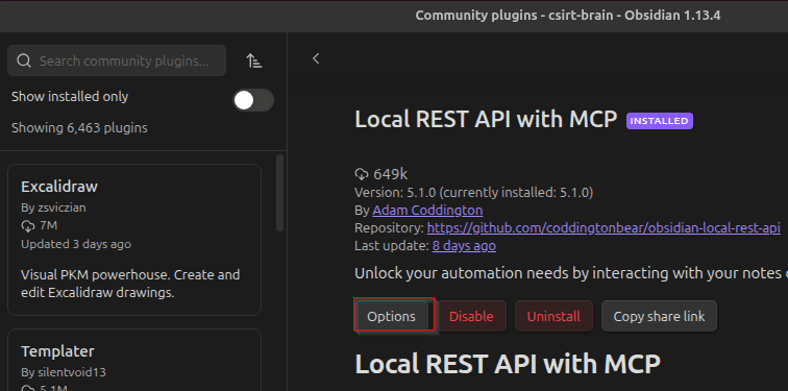
- Search for “Local REST API” (author: coddingtonbear), then click Install.
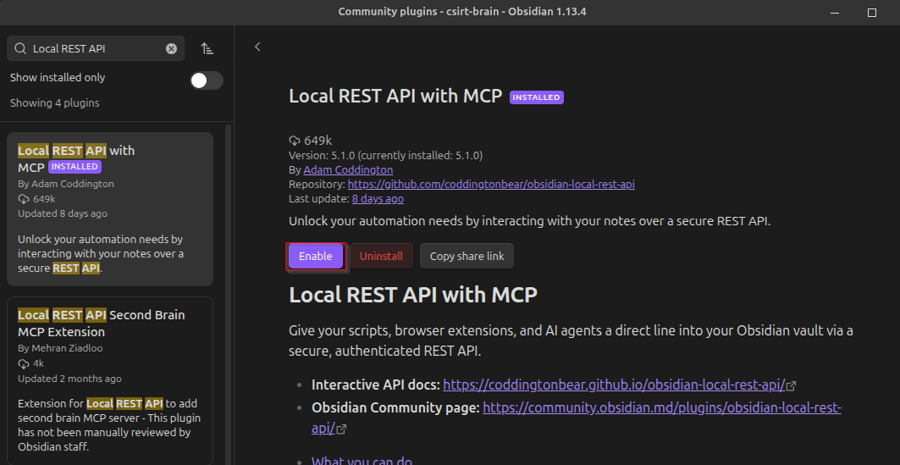
- Then click Enable.
- In the plugin settings (Options):
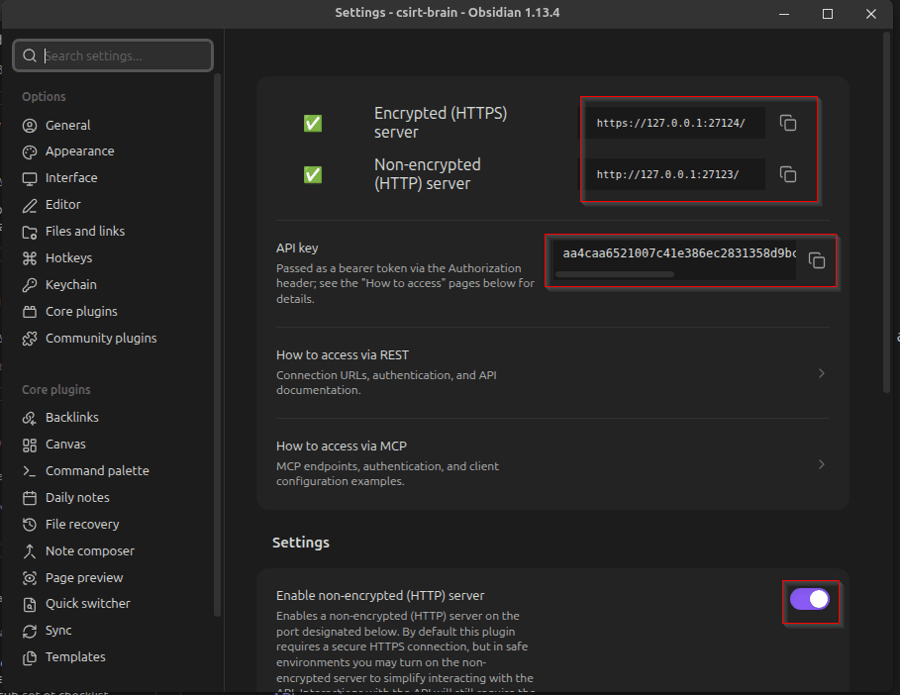
- Enable the HTTP server (to avoid spending time on HTTPS certificate management during the workshop; obviously, don’t do this in production).
- Copy the API key displayed at the top and note the default HTTPS and HTTP endpoints https://127.0.0.1:27124/mcp/. Keep them handy, as we’ll use them in the next step.
Configure OpenCode MCP servers in ~/.config/opencode/opencode.json:
vim ~/.config/opencode/opencode.json
### content ###
{
"mcp": {
"obsidian": {
"type": "remote",
"url": "http://127.0.0.1:27123/mcp/",
"enabled": true,
"headers": {
"Authorization": "Bearer YOUR_OBSIDIAN_API_KEY_HERE"
},
"timeout": 10000
}
}
}Start OpenCode and check that the Obsidian MCP server is connected and working (Obsidian must be running for this step).
cd ~/csirt-brain
opencode
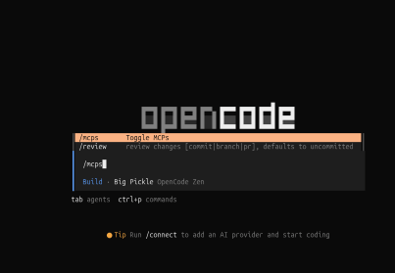
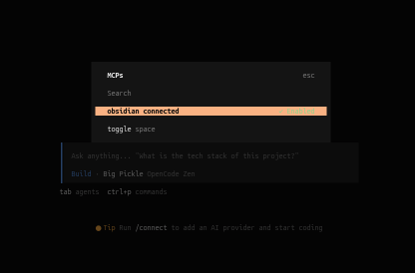
In OpenCode, type “/mcps”, press Enter, and check that the Obsidian MCP server is connected.
To test your MCP connection, you can simply ask OpenCode:
“Based on my Obsidian note, what are my goals as a CSIRT ?”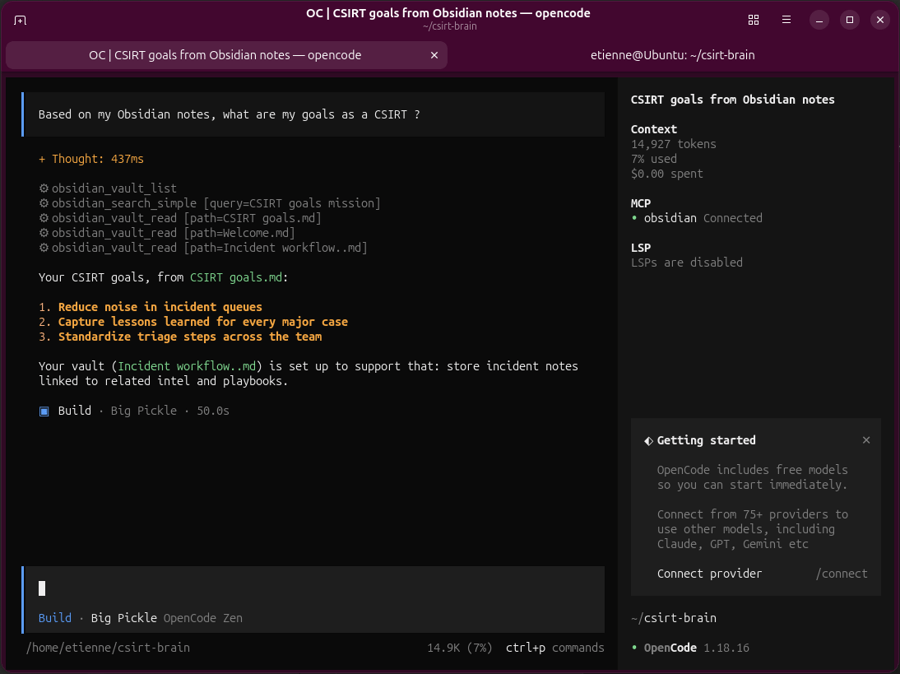
| About the free Big Pickle model used by OpenCode For this workshop, OpenCode is using the free Big Pickle model provided via the OpenCode Zen API. Big Pickle is a cloud‑hosted, zero‑cost coding model intended for smoke‑testing and experimentation, not for long‑term production, and traffic to this endpoint may be used to improve the service. No real incident details, internal source code, credentials, personal data, or customer information should ever be sent to Big Pickle. This lab only uses synthetic data: test Suricata alerts, sample notes, and non‑sensitive vault content. In a production SOC/CSIRT environment, you must instead use a model (cloud or self‑hosted) with clear security, privacy, retention, and contractual guarantees aligned with your organization’s policies; Big Pickle should be treated strictly as a training/demo model, not a production‑grade service. |
4. Initialize the Vault Structure and Guidelines
Now that the “wiring” is complete, let’s configure Obsidian as a centralized alert, playbook, and incident management platform for OpenCode to use.
cd ~/csirt-brain
mkdir -p 00-Inbox 01-Incidents 02-Intel 03-Playbooks 04-Cases 05-Lessons-Learned 06-Assets-Contacts Templates _daily
Your Obsidian vault should now look like this:
Create “AI.md” at the vault root with CSIRT guidelines and writing rules. Here’s an example of what it may look like:
# Vault Purpose
This vault is the working memory for a CSIRT / TF-CSIRT-oriented second brain.
It is used to:
- capture incidents,
- document indicators and threat intelligence,
- store playbooks,
- keep lessons learned,
- and preserve operational context across cases.
# Writing Rules
- Use concise, operational language.
- Prefer facts over speculation.
- Separate raw inputs from analysis.
- Link new notes to existing notes when relevant.
- Keep the structure simple and stable.
- Do not invent details that are not present in the source material.
# Note Types
- Incidents: active or recent security events.
- Intel: indicators, threat reports, actor notes, TTP references.
- Playbooks: repeatable actions for triage and response.
- Cases: complete investigations with timeline and decisions.
- Lessons Learned: retrospective notes and improvements.
- Assets-Contacts: systems, services, people, and external references.
# Tone
Write like a senior incident responder briefing another analyst:
clear, direct, structured, and useful under pressure.
You may add incident, intel, playbook, case, and lessons-learned templates under Templates, or continue and ask your AI to build them from scratch based on an incident, as demonstrated in the next section.
5. Build an Incident Chain from a Raw Suricata Alert
We will use the following raw alert as input:
08/10/2026-11:16:04.305751 [**] [1:2200074:2] SURICATA TCPv4 invalid checksum [**] [Classification: Generic Protocol Command Decode] [Priority: 3] {TCP} 14.116.189.74:57514 -> 54.36.174.127:22Paste a prompt like the following one into OpenCode to let the AI create the incident chain in Obsidian via MCP:
You are helping me initialize a CSIRT second brain in Obsidian through MCP.

Context:
- The vault root is this directory.
- The folder structure is: 00-Inbox, 01-Incidents, 02-Intel, 03-Playbooks, 04-Cases, 05-Lessons-Learned, 06-Assets-Contacts, Templates, _daily.

Use the raw Suricata alert below as the only source input.

08/10/2026-11:16:04.305751  [**] [1:2200074:2] SURICATA TCPv4 invalid checksum [**] [Classification: Generic Protocol Command Decode] [Priority: 3] {TCP} 14.116.189.74:57514 -> 54.36.174.127:22

Your tasks are:
0. If templates are missing creates them.
1. Create one intake note in 00-Inbox.
2. Create one structured incident note in 01-Incidents.
3. Create one intel note for the source IP in 02-Intel.
4. Create one minimal playbook for triaging this kind of SSH-related alert in 03-Playbooks.
5. Create one case note in 04-Cases.
6. Create one lessons-learned draft in 05-Lessons-Learned.
7. Create one asset note for the destination system in 06-Assets-Contacts.
8. Link the notes with Obsidian wiki-links.
9. Do not invent facts beyond the alert; mark unknowns clearly.
10. Use concise analyst-oriented language.

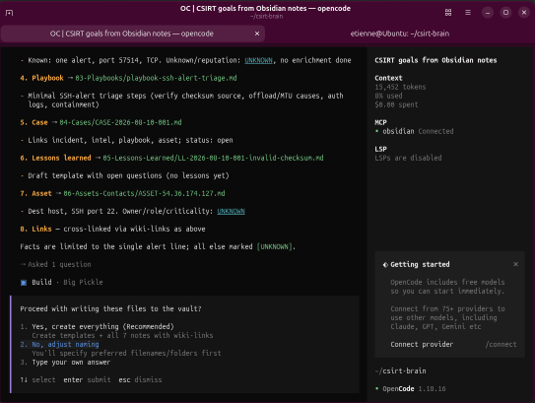
Before writing files via MCP, show the plan and filenames you intend to create, then wait for confirmation.
At this point, the model will ask you a few questions to confirm its proposed actions:
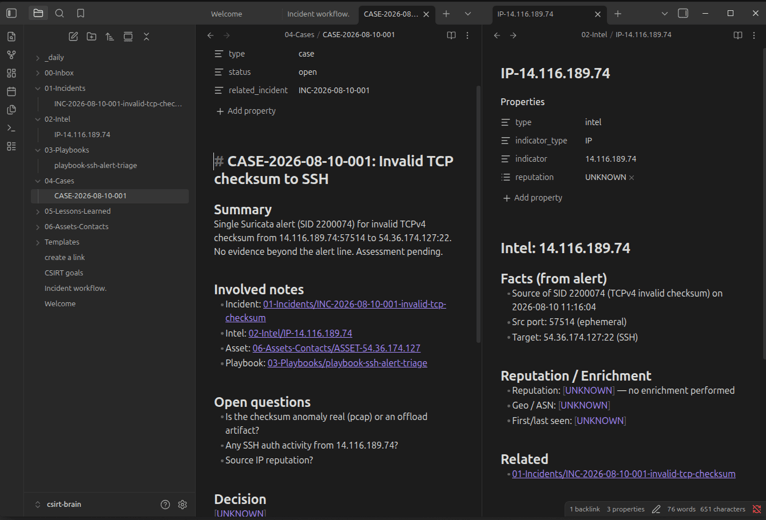
You can now review each investigation step performed in Obsidian:
6. Create an AbuseIPDB Skill and Tool for IP Validation
If you don’t already have an account, register for a free AbuseIPDB account and obtain an API key.
- Register or log in to AbuseIPDB: https://www.abuseipdb.com/register?plan=free
- Go to your account settings and copy your API key (free tier: 1,000 checks/day, enough for a workshop).
- On the VM, set it as an environment variable (you can put this in ~/.bashrc for persistence):
vim ~/.bashrc#add at the end
export ABUSEIPDB_API_KEY="YOUR_REAL_KEY_HERE"- Reload the shell:
source ~/.bashrcCreate the OpenCode tool file
OpenCode can load custom tools from ~/.config/opencode/tools/ or from .opencode/tools/ in a project.
mkdir -p ~/.config/opencode/toolsvim ~/.config/opencode/tools/abuseipdb-check.jschmod +x ~/.config/opencode/tools/abuseipdb-check.jsHere’s your tool code:
// ~/.config/opencode/tools/abuseipdb-check.js
const { z } = require("zod");
module.exports = {
  description: "Check IP reputation via AbuseIPDB and return a compact summary.",
  args: {
    ipAddress: z.string().min(3).describe("IPv4/IPv6 address to check"),
    maxAgeInDays: z
      .number()
      .int()
      .min(1)
      .max(365)
      .optional()
      .describe("Only consider reports from the last N days (default 90)")
  },
  async execute(args, context) {
    const ipAddress = String(args.ipAddress).trim();
    const maxAgeInDays = Number.isFinite(args.maxAgeInDays)
      ? args.maxAgeInDays
      : 90;
    const apiKey = process.env.ABUSEIPDB_API_KEY;
    if (!apiKey) {
      throw new Error("ABUSEIPDB_API_KEY is not set in the environment.");
    }
    const baseUrl = "https://api.abuseipdb.com/api/v2/check";
    const url = new URL(baseUrl);
    url.searchParams.set("ipAddress", ipAddress);
    url.searchParams.set("maxAgeInDays", String(maxAgeInDays));
    url.searchParams.set("verbose", "true");
    const res = await fetch(url.toString(), {
      method: "GET",
      headers: {
        Key: apiKey,
        Accept: "application/json"
      }
    });
    if (!res.ok) {
      const body = await res.text();
      throw new Error(`AbuseIPDB error ${res.status}: ${body}`);
    }
    const json = await res.json();
    const data = json.data || {};
    const reportCategories = (data.reports || [])
      .flatMap((r) => r.categories || [])
      .filter((c, i, a) => a.indexOf(c) === i)
      .sort((a, b) => a - b);
    const categories =
      Array.isArray(data.categories) && data.categories.length > 0
        ? data.categories
        : reportCategories;
    const lines = [
      `IP: ${data.ipAddress}`,
      `Abuse confidence score: ${data.abuseConfidenceScore} / 100`,
      `Total reports: ${data.totalReports}`,
      `Distinct users: ${data.numDistinctUsers}`,
      `Last reported: ${data.lastReportedAt}`,
      `Country: ${data.countryCode} (${data.countryName})`,
      `ISP: ${data.isp} (${data.domain})`,
      `Usage type: ${data.usageType}`,
      `Is Tor: ${data.isTor}`,
      `Is whitelisted: ${data.isWhitelisted}`,
      `Categories: ${(categories || []).join(", ")}`
    ];
    return lines.join("\n");
  }
};
Restart OpenCode in the vault directory (e.g. ~/csirt-brain) and ask it to list tools with /tool.
“List your available tools, do you find the abuseipdb custom one ?”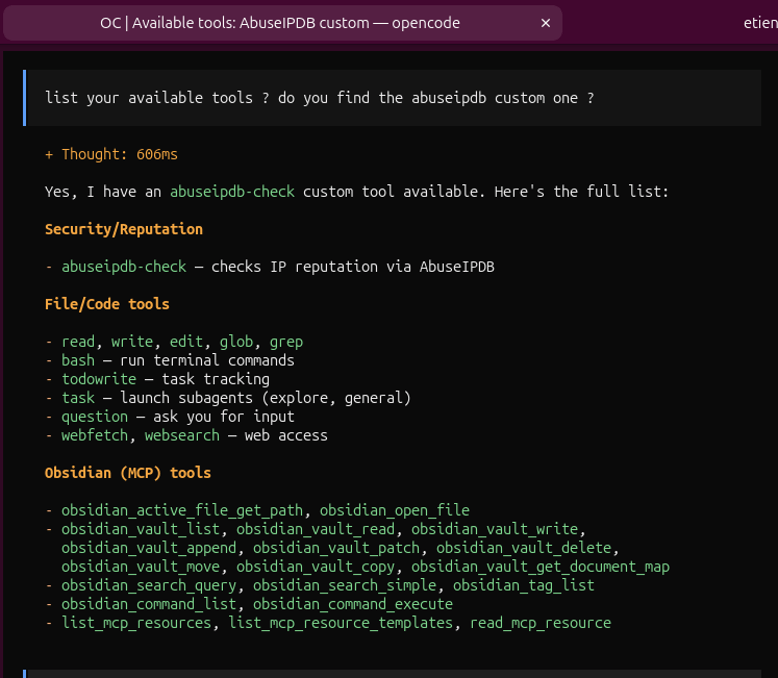
Then define a skill Markdown file in Obsidian describing when and how to run reputation checks and update existing notes. You can save it directly in Obsidian, for example as 03-Playbooks/skill-abuseipdb-ip-check.md
Here’s what the skill may look like:
# Skill – AbuseIPDB IP Reputation Check
## Purpose
Use AbuseIPDB to quickly assess IP address reputation during incident handling and CTI work.
Results help distinguish likely malicious infrastructure from benign or unknown sources.
---
## When to use
Run this skill when:
- Investigating alerts involving external IPs (brute force, scanning, suspicious outbound traffic).
- Enriching existing Intel notes on infrastructure used in past incidents.
- Reviewing cases where blocking / allow‑listing is being discussed.
Do **not** use for purely internal RFC1918 addresses.
---
## Prerequisites
- OpenCode running in the `csirt-brain` vault.
- Custom tool `abuseipdb-check` installed on the VM and loaded at OpenCode start.
- Environment variable `ABUSEIPDB_API_KEY` set on the VM.
---
## How to run the check
In OpenCode, within the relevant incident / case context, ask the assistant:
> Use the `abuseipdb-check` tool to look up reputation for `<IP>`
> with `maxAgeInDays = 90`. Summarize the result and propose updates to:
> - the Intel note for this IP,
> - the Incident note,
> - and the Case note, clearly separating CTI data from local observations.
You can adjust `maxAgeInDays` (e.g. 30, 90, 365) depending on how far back you care about reports.
Key fields returned:
- `score`: Abuse confidence score (0–100, higher = more likely abusive).
- `totalReports`: Number of reports in the selected time window.
- `lastReportedAt`: Timestamp of last report.
- `countryCode`, `usageType`, `isp`, `domain`: Context on hosting and usage.
- `categories`: List of abuse categories (e.g. SSH brute force, web spam).
---
## How to update notes
### Intel note (per IP)
In the IP’s Intel note, add a short “AbuseIPDB” subsection:
- Summary of score, total reports, last reported date.
- One‑line interpretation (e.g. “High confidence abusive SSH scanner”).
- Any notable categories / hosting info (bullet list).
Example:
> AbuseIPDB (last 90 days): score 86, 27 reports, last seen 2024‑10‑02.
> Categories: SSH brute force, port scanning. Hosting: VPS provider in NL.
### Incident note
Under “External infrastructure / CTI”:
- Add a bullet referencing the IP and its reputation (high / medium / low).
- Clarify what part is **CTI data** (AbuseIPDB) vs **local observations** (logs).
Example:
> `[CTI] AbuseIPDB: 14.116.189.74 has score 86, 27 reports for SSH brute force.`
> `[Local] Same IP seen in failed SSH logins on srv‑web‑01 during the incident window.`
### Case note
In the case‑level summary / lessons learned:
- Add one bullet describing how AbuseIPDB informed decisions (e.g. blocklist, extra monitoring).
- Link back to the Intel and Incident notes for details.
Example:
> AbuseIPDB confirmed repeated abusive activity for 14.116.189.74, supporting decision to block at perimeter and track future sightings.
---
## Limitations and reminders
- AbuseIPDB data is community‑driven and may contain false positives; always correlate with local logs.
- Free tier rate limits apply; avoid bulk lookups and focus on key IPs in the scenario.
- This skill is for **reputation enrichment**, not for attribution or definitive malicious verdicts.
You can now ask OpenCode to perform a reputation check on the IP address in our alert.
7. Re-run the Alert with CTI Skill Enabled
Run a second OpenCode session in the vault root and ask the model to work on another alert:
07/18/2026-12:18:58.606722 [**] [1:2210058:1] SURICATA STREAM suspected RST injection [**] [Classification: Generic Protocol Command Decode] [Priority: 3] {TCP} 54.36.174.127:443 -> 193.32.126.218:53938Here’s an example prompt for your new session:
We have a new Suricata alert to analyze:

07/18/2026-12:18:58.606722  [**] [1:2210058:1] SURICATA STREAM suspected RST injection [**] [Classification: Generic Protocol Command Decode] [Priority: 3] {TCP} 54.36.174.127:443 -> 193.32.126.218:53938

Treat this as a fresh alert and perform the steps explained in obsidian, relying on existing tools and playbooks.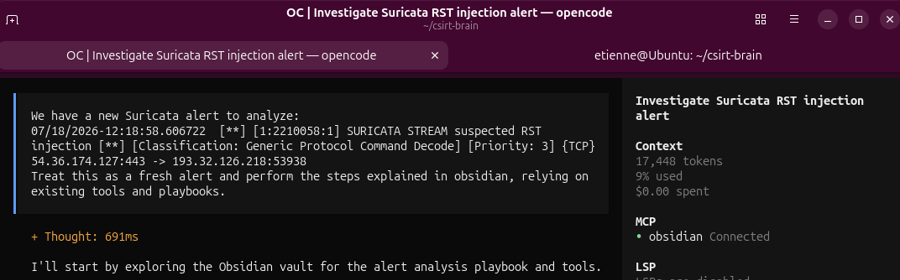
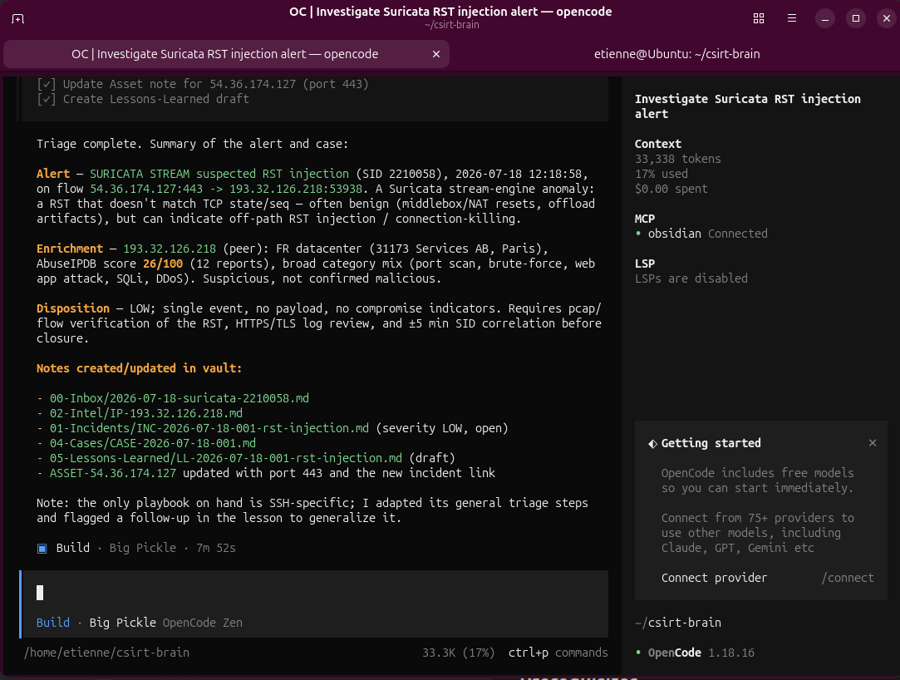
You can now review the case analysis in Obsidian and decide whether your second brain processed the alert properly.
8. Wrap-up, Final Thoughts, and Limitations
At the end of the workshop, each participant has a working CSIRT-oriented second brain:
– an Obsidian vault with structure, guidelines, and an incident chain,
– an AI layer (OpenCode) connected via MCP,
– a CTI tool available in OpenCode to enrich IP reputation using AbuseIPDB.
This workshop shows that it is feasible to build a CSIRT‑oriented “second brain” on an analyst’s workstation using Obsidian, OpenCode, MCP, and a small CTI tool like abuseipdb-check. It turns scattered alerts and one‑off investigations into linked notes, playbooks, and cases that the AI can reuse on the next incident.
The system does not replace analysts, but it reduces friction in capturing, structuring, and reusing incident knowledge to speed up alert processing and improve efficiency. However, the lab setup is intentionally simplified and comes with important limitations:
- Real alerts used in a lab exercise
The demonstration includes a real Suricata alert from the server hosting this blog, alongside sample notes and a training vault. The resulting incident chain is an exercise, not a validated production investigation. In a real SOC/CSIRT, you must treat incident data, customer information, and internal infrastructure details as sensitive, and ensure any AI model or tool chain complies with your organization’s security and privacy policies. - Demo model only (Big Pickle)
The free Big Pickle model exposed via the OpenCode Zen API is designed for experimentation and smoke tests, not long‑term production use. Traffic to this endpoint may be used to improve the service, and there are no strong contractual guarantees; in production you should switch to a governed model (cloud or self‑hosted) with clear retention, access control, and compliance posture. - Hallucinations and brittle parsing: one incident chain and a minimal playbook
This lab deliberately works with a single incident chain and a small number of closely related notes so that prompts stay short and focused. In real CSIRT environments, a large vault with many incidents, intel entries, and playbooks can easily overload the model’s context window if queries pull in too many documents at once; research shows that long, noisy prompts increase hallucination rates and make models “lost in the middle”, even when the underlying data is correct. Any production‑grade second brain must therefore include retrieval discipline (only fetch the most relevant notes), hierarchical or scoped queries (per case, per incident, per topic), and human review of AI‑generated updates to avoid the model blending unrelated cases or inventing links that aren’t present in the source material.
Other limitations include the use of HTTP for the MCP server, AbuseIPDB limitations, and the maintenance and ownership of this infrastructure. These limitations are deliberate choices to keep this workshop short and accessible from a standing start: the goal is to give TF‑CSIRT participants a safe, hands‑on sandbox to explore AI‑assisted incident workflows.
9. What if I want to go to production?
Architectural evolutions
If you want to evolve this setup towards production, consider at least the following design changes:
- Scope the AI to one case or incident at a time
- Anchor each AI session to a specific intake, incident, or case ID.
- Ask the model to work only with notes directly linked from that case (and their immediate neighbors), rather than “the whole vault”.
- This reduces context size and avoids mixing alerts from different customers or time periods.
- Insert a retrieval layer in front of the vault
- Instead of dumping all Obsidian notes into the prompt, add a small retrieval component (script or service) that selects only the most relevant notes based on folder, tags, backlinks, and incident/case IDs.
- This turns the second brain into a light retrieval‑augmented generation (RAG) pipeline: retrieve a few ranked chunks, then let the model reason on them.
- Use overview notes and summaries for long cases
- For major cases, maintain a short “Case Overview” note (scope, timeline, key decisions, main IOCs) that links down to detailed sub‑notes.
- Use these overviews as the primary AI context when comparing cases or extracting lessons learned, rather than feeding full incident timelines into the model.
- Tighten prompts and add guardrails
- Repeat critical constraints near the end of prompts: “Do not invent incidents or indicators not present in the retrieved notes; mark unknowns explicitly.”
- Ask the AI to reference specific notes or playbooks by filename when making recommendations, so analysts can quickly verify sources.
- Use two‑step prompts (first: “list the notes you relied on”, second: “answer based only on these”) to keep reasoning grounded.
- Apply strict token budgeting and retrieval discipline
- Cap the amount of text passed per query (for example, a handful of high‑relevance notes instead of dozens).
- Split large notes into sections/chunks and rank them by similarity to the current question, so only the top few are included.
- This mitigates “lost in the middle” effects and reduces hallucinations caused by noisy, oversized prompts.
- Keep humans firmly in the loop
- Treat the second brain as decision support, not automation: analysts should review and accept/modify severity changes, containment actions, and playbook edits before they are committed.
- Periodically curate AI‑generated content (new playbooks, merged cases, summaries) to keep the knowledge base coherent and trustworthy.
Move incident management to a dedicated platform
For real incident lifecycle management, Obsidian alone quickly becomes limiting. A common evolution is to:
- Use a Security Incident Response Platform (SIRP) like TheHive for alerts, cases, tasks, and observables.
- Keep Obsidian primarily for:
- playbooks and SOPs,
- templates,
- lessons learned and narrative write‑ups.
TheHive was originally released as a free/open‑source incident response platform and integrates well with CTI sources such as MISP and analysis engines like Cortex. Recent versions are commercially maintained by StrangeBee; organizations should evaluate licensing and support options before adopting it in production.
If you prefer to stay strictly on free/open‑source stacks, other incident/case systems worth evaluating include:
- Wazuh, an open‑source SIEM/XDR with incident response, which can be paired with a case system or ticketing tool.
- IRIS, FIR, or similar community case platforms for structured incident tracking.
- General OSS ticketing/issue trackers (e.g. Request Tracker, GitLab, or GitHub Issues) with IR‑specific workflows.
In a production architecture, the AI would typically:
- read high‑level case context from TheHive or an equivalent platform (via API or MCP tool),
- use Obsidian (or Git‑backed playbooks) for procedures and lessons learned,
- and propose updates that are then applied back to the case system by humans or automation.
Separate playbooks and templates into versioned Git
As playbooks and templates mature, keeping them only inside Obsidian becomes risky (no strong review workflow, no diff history, no code‑like governance).
A practical evolution is to:
- Move playbooks, SOPs, and templates into a Git repository (Markdown, YAML, or STIX‑like structures), with code review and branching.
- Keep Obsidian as a local “reader/editor” backed by that Git repo, or use a documentation front‑end (MkDocs, Docusaurus, etc.) on top of the same content.
- Let the AI read from the Git‑backed corpus via a retrieval tool (e.g. a repo search API or MCP connector) rather than raw local files.
This improves change control (pull requests, approvals, traceability) and makes it easier to share playbooks between CSIRTs while keeping incident data in separate systems.
Integrate SIEM, EDR, and CTI platforms via tools/MCP
For production, you will want the second brain to see what your SOC already sees, instead of only lab Suricata alerts and a single IP reputation API.
Typical evolutions:
- SIEM integration
- Add tools or MCP connectors for your SIEM (Splunk, Wazuh, Graylog, etc.) so the AI can:
- retrieve alert context, correlated events, and timelines,
- run saved searches,
- attach relevant log excerpts to cases.
- Carefully scope queries (per case, per time window) to avoid flooding the context window with raw logs.
- Add tools or MCP connectors for your SIEM (Splunk, Wazuh, Graylog, etc.) so the AI can:
- EDR / XDR integration
- Provide tools to query endpoint telemetry, process trees, and file events from your EDR/XDR platform, and to link those findings back into incident notes or TheHive cases.
- Start read‑only (query only) before allowing any AI‑driven response actions.
- CTI platforms (OpenCTI, MISP)
- Integrate with MISP for indicator sharing and event‑based enrichment, especially for IPs, domains, hashes, and mail artifacts.
- Integrate with OpenCTI as a structured CTI knowledge graph (actors, campaigns, techniques, IOCs in STIX 2.1) so the AI can use rich relationships when reasoning about threats and attribution.
- In many architectures, TheHive, MISP, and OpenCTI form a triangle: cases ↔ observables ↔ CTI graph; your AI layer can sit on top as a reasoning assistant, provided access and scoping are carefully controlled.
Each integration should be treated as a separate tool or MCP server with explicit scopes, rate limits, and logging, rather than one giant “AI can see everything” connector.
Additional evolutions to consider
Depending on your maturity and regulatory environment, you may also want to:
- Harden identity, access, and secrets management
- Move API keys (AbuseIPDB, CTI feeds, SIEM) into a secrets manager rather than flat files; use short‑lived tokens and service accounts.
- Enforce role‑based access control on incident and CTI platforms so AI‑driven tooling can only see what the analyst is allowed to see.
- Design multi‑tenant or multi‑environment support
- Separate vaults, Git repos, and CTI/incident systems per customer, business unit, or environment (prod vs lab) and make sure tools and prompts clearly indicate the current tenancy.
- This reduces the risk of cross‑tenant data leakage or mixed‑up recommendations.
- Instrument monitoring and audit logs for AI actions
- Log which tools were called, with which parameters, and which notes or cases were modified based on AI suggestions.
- Periodically review these logs to refine prompts, retrieval limits, and playbook design.
Taken together, these evolutions allow the TF‑CSIRT “second brain” prototype to grow into a production‑grade architecture: one where AI helps analysts interpret alerts, reuse institutional knowledge, and coordinate response across incident, SIEM, EDR, and CTI platforms, without drowning in context or letting hallucinations silently drive decisions.
APPENDIX
Installation Path B – Docker Stack
(Optional, for those familiar with Docker environments)
Install Docker from the official repositories.
sudo apt update
sudo apt install -y ca-certificates curl gnupg
sudo install -m 0755 -d /etc/apt/keyrings
sudo curl -fsSL https://download.docker.com/linux/ubuntu/gpg -o /etc/apt/keyrings/docker.asc
sudo chmod a+r /etc/apt/keyrings/docker.asc
echo "deb [arch=$(dpkg --print-architecture) signed-by=/etc/apt/keyrings/docker.asc] https://download.docker.com/linux/ubuntu $(. /etc/os-release && echo \"${UBUNTU_CODENAME:-$VERSION_CODENAME}\") stable" | sudo tee /etc/apt/sources.list.d/docker.list > /dev/nullsudo apt updatesudo apt install -y docker-ce docker-ce-cli containerd.io docker-compose-plugin
#check install and versions
docker --version
docker compose versionsudo usermod -aG docker $USERLog out and log back in, then:
docker run --rm hello-world
docker network create --driver bridge --subnet 172.20.0.0/16 secondbrain_net
cd ~/
mkdir secondbrain
cd secondbrain
vim docker-compose.ymlExample docker-compose.yml (Obsidian + OpenCode):
version: "3.9"

services:
  obsidian:
    image: lscr.io/linuxserver/obsidian:latest
    container_name: obsidian
    environment:
      - PUID=1000
      - PGID=1000
      - TZ=Europe/Paris
    volumes:
      - ./obsidian_config:/config
    expose:
      - "3000"
    shm_size: "1gb"
    restart: unless-stopped
    networks:
      secondbrain_net:
        ipv4_address: 172.20.2.10

  opencode:
    image: ghcr.io/anomalyco/opencode:latest
    container_name: opencode
    stdin_open: true
    tty: true
    volumes:
      - ./workspace:/workspace
      - ./opencode_config:/root/.config/opencode
    working_dir: /workspace
    restart: unless-stopped
    networks:
      secondbrain_net:
        ipv4_address: 172.20.2.11

networks:
  secondbrain_net:
    external: true
You can now start your Obsidian + OpenCode stack:
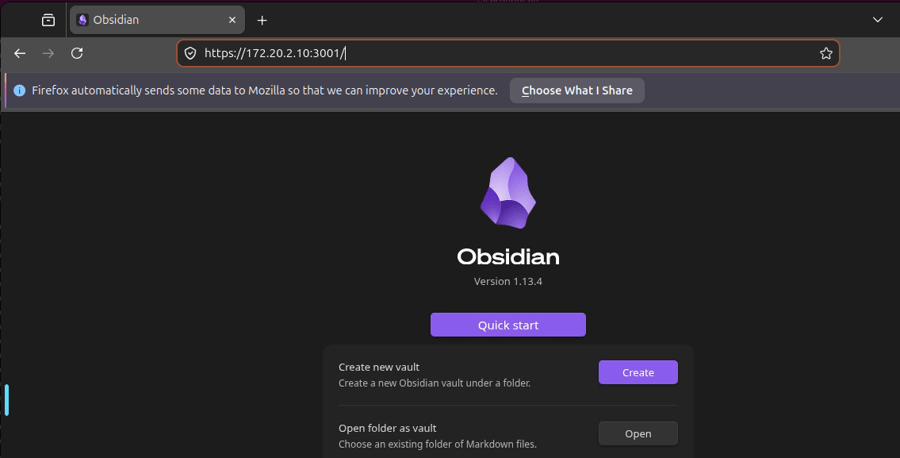
docker compose up -dThen open Obsidian in a web browser: